Showing posts with label kid quotes. Show all posts

Sunday, August 10, 2008

A little bit of playing catch-up

So, in addition to making digiscrapping stuff, I've been sewing. Like a maniac. I've only got pictures of a couple of things, and have several more things that are almost done, but I thought I would go ahead and post what I've got =D

First up is a dress I made for Ellie. She had a complete meltdown after I bought school supplies and uniforms for the big girls. I sent her to bed and after a couple of minutes, she started screaming. So, I asked Madeline what was wrong.

Madeline: "She thinks you don't love her because you didn't buy her anything."
Me: "ELLIE!!! Come here!!!"
Ellie: "Why don't you love me!?!?!?"
Me: "What? Well, you know, no one *ever* buys you anything, I *never* sew things for you, I *never* take you anywhere, and you are just *totally* neglected."
Ellie: "I knew it was true!!!" insert more screaming here...

She then ran upstairs, threw herself on her bed and sobbed. Ugh. Sarcasm is TOTALLY wasted on a 4 year old. So, Madeline goes to the rescue, and goes up after her to see how to fix this situation. A minute later, I get this.

Madeline "She says she wants some new clothes."
Me: "Ok, see if she is okay with me sewing her a new dress."
Madeline (after talking to Ellie): "A spinny one?"
Me: "Sure. A spinny one."
Madeline (after more conferring with Ellie): "She wants to pick the fabric."
Me: "Ok, whatever. That's fine."

Madeline trots back upstairs to report that I've agreed to Ellie's negotiations, and I hear Ellie say "Yea!" Then not another sound until the next morning.

So who actually won that one? Hmmmmmmmm..... I wound up making a dress from the 03/07 Ottobre, and I used a vintage duckie fabric I acquired some time back, and scraps of red gingham that was in my stash. I am really happy with how it turned out - I opted to add a placket instead of inserting a zipper, and love the results. If I make this dress again, I will do it a little differently, as the placket turned out very bulky.

Photobucket
Photobucket

Then there is Noah's gnomes outfit. I bought a couple yards of Heather Ross Gnomes on blue, then managed to find the coordinating stripe last year. I had kind of tentatively been planning to make it with these patterns from the 03/06 Ottobre. I opted to leave the flaps off the shirt pockets, omitted the tabs on the sleeves, and shortened the sleeves some (not enough, IMO). I figured that if I left off those things, I could dress it up a bit, as there was plenty of the gnomes left to make a jonjon. Haven't finished that yet, but I'm almost there. I'm really pleased with how the patterns fit, except for the one problem I always have with Ottobre. The pants are pretty short in the rise, and we are all long in the rise around here. No biggie - just adding an inch to the kids stuff works great. However, since I hadn't made pants for Noah before, I thought I would go with the pattern as it was written, and I could modify future projects. I'm totally thrilled with how this outfit turned out!!!

Oh my, he really wanted to sit down, but it had been raining! Ack! And we were on our way to church!
Photobucket

Pocket detail:
Photobucket

Pants back detail:
Photobucket

Photobucket

And I got a smile out of him!!!! That made my day!
Photobucket

And there you have it - my excitement for the day ;o) I'm off to sew some more!

Sunday, July 13, 2008

Poor 'Wuh! (And a sewing tutorial, too)

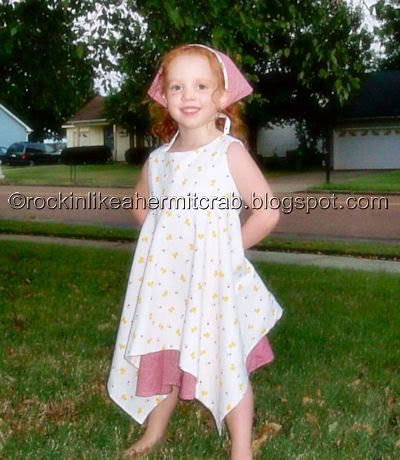
I had the funniest realization the other day... I was trying to get Noah to say his name, and he just kept saying "Wuh", not "Noah". It finally hit me - poor little guy must think we are always fussing at him!!! "Hey, no Wuh!" "Come here no wuh" "Whatcha doing, no Wuh?" "Don't throw things, no Wuh." I bet he thinks that Ellie *never* gets into trouble! In retrospect, no matter how nice I think the name Noah is, it may not have been the best choice... LOL!

I thought I would post a tutorial for making a lined a-line jumper. I did this a while back, and it was on a sewing message board, but I figure someone might benefit from it being on my blog, too. I have it in PDF format, if anyone wants it - just let me know.

The pattern I’ve used for this is “Frannie” by Children’s Corner. This can also be applied to sheath-type dresses or a-line jumpers that do not fasten at the shoulders.

I was taught this method by Lezette Thomason of Children’s Corner in a class she held for my local chapter of SAGA (the Smocking Arts Guild of America). The pattern itself provides fairly good instructions for doing this, but I couldn’t wrap my head around it until Lezette showed it to me. I hope this helps someone – I wish you could all be as lucky as I am and live within a couple hundred miles of this amazing woman!!! Since I know that isn’t possible, I have done my best to try to lay it out clearly. If you have any questions, feel free to ask, and I will do my best to answer them for you.


Cut out pattern and trace all markings onto fabric. Sew shoulder seams of outer fabric and lining. Matching shoulder seams, and centers, pin lining to fabric, right sides together.


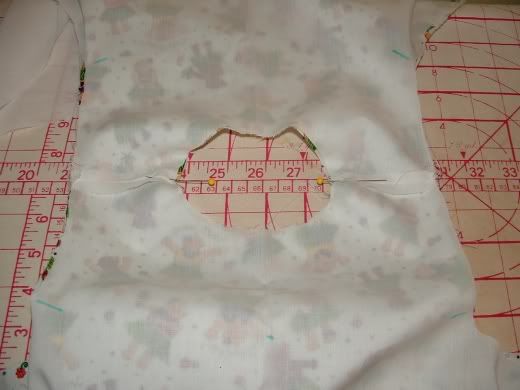
Sew around neckline, making sure shoulder seams on lining are even with the shoulder seams on the dress. This particular pattern has a back opening, as the neckline isn’t deep enough to go over the child’s head without it.


Trim and clip seam allowance, being sure to clip the curves so fabric will lay smoothly when turned right side out.


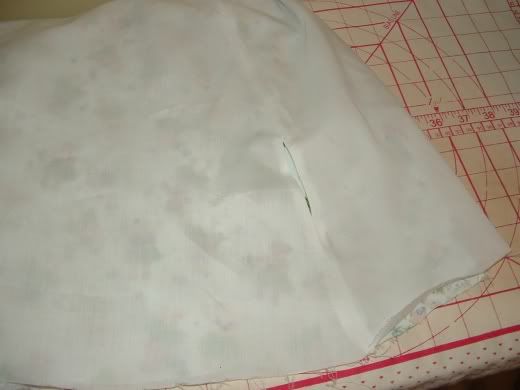
Turn dress right side out and press neckline well.


With dress lying flat in front of you, and right side of outer fabric facing up, bring left side of outer fabric over towards center. Then, take left side of lining fabric and bring it under, towards center. You will pull both the outer layer and the lining all the way across, sandwiching the right shoulder area between them.


This is what it should look like from the side:


Pin together, making sure that the shoulder seams match, and the other parts of the dress aren’t caught.


Being careful not to catch any extra fabric, sew the left side together, starting at one side, and continuing the length of the armhole.


Here it is, sewn from one edge to the shoulder seam. Here you can see the rest of the dress, bunched up in the tube being created by sewing the left armhole.


After sewing the left armhole, this is what you will have.


Clip the curves so seam allowances will lay flat when turned right side out, and press well.


To turn right side out, simply pull the fabric through the left shoulder. The entire dress will come through, and it will look something like this while you are doing it:


Repeat with right side, and press both armholes well. Cool, huh!


Now, you will press open the underarm seams, and matching front to back, sew the outer dress and the lining. You will do this on both sides, leaving an opening on one side large enough to comfortably accommodate your hand (6” is recommended by the instructions given by Children’s Corner).


The easiest way I have found to make this opening is to stitch up to the beginning of the opening, then backstitch to secure your stitches. Change to a long stitch length, and sew to the end of opening area. Switch back to regular stitch length, and backstitch to secure before finishing the seam. This enables you to press the entire seam open neatly and evenly, making it easier to sew closed when you are done.


Once you have sewn these seams and pressed them open, remove the basting threads from the opening.


Smooth the lining over the dress, with the opening facing you.


Reach through the opening, matching side seams, and pin lining to outer fabric at the hem, right sides together.


At this point, I like to stitch a few inches at one of the side seams so I don’t lose my bearings. Continue to pull the whole dress through the opening, and sew around the entire hemline, matching centers and seams.


It will look like a very confused fabric tunnel when you get done with this part! You will now press the hemline that you have just sewn.


The last step is to pull the dress back through the opening, and press again, making sure the fabric is even and there are no areas that are bunched up. Viola!


You now have a fully lined and/or reversible jumper that just needs a few stitches to close up the opening you used for turning the dress. Add a button and a loop to the back opening, and you are done!


Notes:

If you are using the Frannie pattern, and putting the drawstrings in the sides, be sure to add buttonholes as called for by the pattern.

When using this method for a narrower (sheath) style, or a regular a-line jumper, you won’t have to worry about the casings and elastic or drawstrings. The Frannie pattern has a lot of extra fullness built into the sides and uses these to pull it in.

I personally find the ties to be quite a nuisance with toddlers and preschoolers, so I sew the casings as directed after finishing the hem, and insert elastic, sewing securely at front and back ends of the casing. I use approximately 4 ½” of 3/8” elastic on each side to give it a close, fairly stretchy fit. After inserting the elastic, I hand stitch the inner opening closed, and tack ribbon or a bias tube to the side seams over the casing to give it the look of a drawstring without the hassle.

I have used narrower elastic (1/4”, as called for by the pattern), and found that Ellie really likes to pull her arms into her dress and see how far she can stretch it! 3/8” - 1/2" elastic is much firmer, and has less give, so it’s not as tempting (or fun LOL!).

With the real drawstrings, the gathers weren’t nearly as nice and even, and Ellie would untie them and pull the sides out all the way, causing her to look like she was wearing a tent…!

Tuesday, July 8, 2008

Happy Birthday, Ellie!

Yeah, so I don't have her dress done, nor have I managed to take a really nice birthday picture of her, but she has made it to 4!

Today, she was being her usual cranky self, so I told her to take a nap. She totally freaked on me! I asked what her problem was, and you know what the answer was? Yep - "But I don't wanna miss my birthday!!!" ROFLMBO! She is too much! A little later, Adron was trying to talk her into taking a nap, and told her that she wouldn't miss her birthday. Her answer to that was "Well, I won't miss it if I don't take a nap." Oh yes, she is GOOD! The best part - guess where she is right now? ::evil grin::

Photobucket

I can't tell you how excited I am about the Core plan! This week, I was down 3.8 lbs.!!! Lemme tell you, it was so hard this week, too! When we went to my IL's on Friday, I took some Core coleslaw and some 1 point Whitewheat buns. I did eat some of the pork shoulder, but I only had one sandwich, and a very small serving of macaroni and cheese. The desserts just about killed me though! There was a homemade chocolate cake - I had a *tiny* little sliver of it. There was the Butterscotch 4-Layer Dessert (if you aren't familiar with that one, Google it! It is amazing!), and I only had a tiny sliver of that. Then there was the homemade strawberry cake. Oh wow! I can't begin to describe just how yummy and scrumptious that is!!! I had the same tiny sliver of that one, then I finished the rest of Ellie's, and what Noah didn't eat... Granted, it was more than I should have eaten, but all-in-all, I doubt if it was more than about a whole piece anyway. It was totally worth it, too! Then we went to Corky's for Ellie's birthday on Sunday. I was totally good and got the baked potato with shredded chicken. I didn't tell them to hold the butter or cheese, but I opted not to put the sour cream on. Adron and I were sharing the potato and an order of tamales, so I only had half of the potato, and 2 bites of a tamale. Plus their heavenly rolls (I didn't add butter to mine), and a piece of birthday cake. I wasn't perfect, but I did so much better than I've ever done before! It's all about baby steps, and I took a bunch this weekend!

Oh, my goal is to lose 50 lbs. before my brother's wedding, which looks like it will probably be around March of 2009. I know I can do it! I have to average about 1.5 lbs. a week, and this week was a great start. In the 2 weeks I've been doing the Core plan, I have lost 6.4 lbs. Not bad, huh! I'm not worried about being skinny for the wedding, I just know that I work better when I have a deadline.

I've just discovered the world of ATCs, and here is my 1st (digital) attempt. I am totally in love with the whole altered art style, but I have a hard time working that way. I'm not sure at all what my style is, but I don't think it's altered art at all, but I sure wish it was LOL! Later, I'll have to post a couple of LOs I have done in that style... I am trying to figure out where to get collage sheets so I can make some real ATCs, not just the digital variety. If anyone has any good links, please let me know!!!

Photobucket

Tuesday, June 10, 2008

Noah is so stinkin' CUTE!

Well, I still haven't made a new LO for Max - I am really leaning towards a bright colored LO with lots of sunny energy, but haven't gotten the right groove yet... I do have a couple of new kits I have acquired recently that may fit the bill though!

In other news, Noah is rapidly approaching 2. Grrrr. That means lots of screaming fits, and let me tell you - he is LOUD!!!! He also is refusing to take much needed naps ever since he learned how to climb out of his crib. That is the beginning of the latest cute story ;o) You've heard the expression that is something to the effect of "I've forgotten more in my lifetime than you have learned in yours"? That is starting to really hit me because I know there is so much I have forgotten about the kids growing up. They have done so many cute and sweet things, and I don't remember most of them. Well, here's to hoping I remember this one!

So, I put Noah to bed the other night, and within a few minutes he was out of his crib, standing at his door crying. No, make that screaming. I have been letting him cry for a little while every time I put him to bed in the hopes that he will fall asleep. However, after 10 minutes of fussing off and on, I give up and retrieve him. This is so hard for me, as I HATE the idea of making a baby "cry it out". Anyway, I went up to get him the other night, and when I opened the door, he was so happy to see me. He looked up at me with tear-stained cheeks and a sweet little smile, and said "Mommy!" Of course, that melted my heart, but I had to be strong. {Yeah. Gotta show those babies tough love lol!} So I kinda looked at him funny, tried to be stern with him, but couldn't say anything with him looking so pitiful. I looked at him for a few seconds, he looked down, shifted his weight from foot to foot a couple of times, paused, then looked up at me, and with a sheepish smile, arms down by his sides, he turned his palms out and sweetly said "Tadah!" OMGoodness! I fell out laughing, scooped him up, gave him the biggest hug ever, and brought him back downstairs! I am so in love with that boy!

In other cute Noah news, Adron has been trying to get him to say "I love you". However, when he would ask him to say it, Noah would make kissy sounds. Sweet, right? Well, now, he still won't say "I love you", but he has started trying to sign it! Yummy cute, huh!

Ellie is rapidly approaching 4, thank goodness, and has become a much happier, less screamy little girl than I have seen for the past year or so. I love, love, LOVE 4!!! She is so smart and funny and full of herself right now! Madeline is dealing with 10, which is such an awkward, in-between age, but is just the sweetest kid ever. Audrey is certainly a teenager, and is full of all the appropriate attitude and angst, and it's hillarious. I keep thinking that some day all the kids will get along beautifully, and then I wake up lol! They really do get along great, and the amount of bickering and fighting I have to deal with is much less than I remember when I was growing up and fighting with my brothers and sisters. I feel so blessed to have the wonderful family God has deemed me worthy of, and I think Him for the gift of these precious little souls! I am totally humbled that He saw fit to allow me to have four amazing children, and I pray that I am able to be a good mother to them.

Ooooooh! I lost 2.2 lbs this week!!! WOOOHOOO!!! I haven't lost in about a month, and with as stressful as June is for me, I was just hoping to have gained no more than 1 lb. this week. Not only did I not gain, I lost a significant amount!!! This week, I am going to try to get back on track and journal my eating. Heck, I suppose I could do that here, huh? Ok, so that is my goal for this week. I'm also planning to try the Wendie plan. That should be interesting - it makes perfect sense to me, and I should see results next week if it works right. The next plan would be to switch over to the Core plan, which has worked incredibly well for my baby sister. But I'm not sure how well it would work using it to feed the family. We'll just have to wait and see what happens... I suppose I should also refigure my daily Points allowance, since being a nursing mom gives me a whole lot more points than I would otherwise have. I am still breastfeeding Noah, of course, but now that he is down to a couple times a day, I have a suspicion that my nutritional needs aren't quite as great. Then again, I did lose this week eating ay my nursing level of Points. I think I'll try the Wendie plan, and if it doesn't give the desired results, I can try dropping my Points and see how it goes. But that is a problem for a different day ;o)

Tuesday, May 27, 2008

The things they say...

Noah said this and I thought it was about the cutest thing ever!  Adron and I were lying in bed waking up, and I had my head on his shoulder with his arm around me.  Noah crawls into bed with us and starts squealing at me "Pip-pooh YOU! Nohannon!"It took me a sec to realize what he was saying, and when it hit me I laughed SO hard!  "Pillow YOU! No hand on!"  I suppose he thought I should have my head on my pillow and Adron shouldn't put his hand on my shoulder?  ROFLMBO!!!